Stock transfers between branches: send, then receive

When one branch has too much of something and another has run out, send it as a transfer. The goods leave the sender’s stock at once and stay “in transit” until the receiving branch counts and confirms them — so nothing is counted twice and nothing quietly disappears.

Try 7 days freeNo payment card needed

The short answer

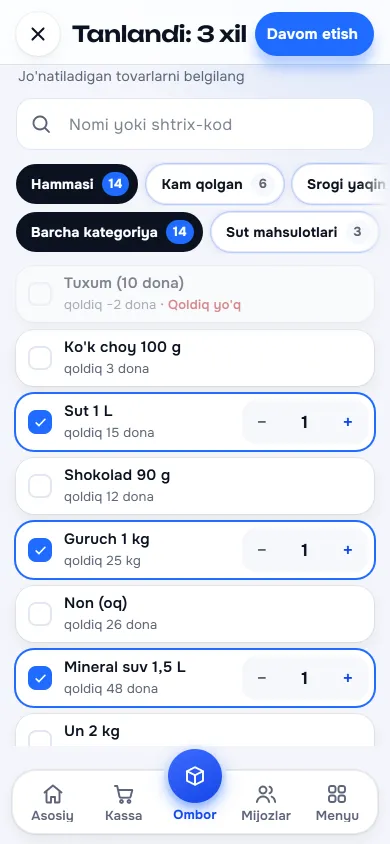
Selecting goods to send to a branch on the Stock screenSelecting goods to send to a branch on the Stock screenNew design
Selecting goods to send to a branch on the Stock screenPrevious design
Picking goods“Select” in Stock: tick the goods to send and set each quantity — scanning a code works too.
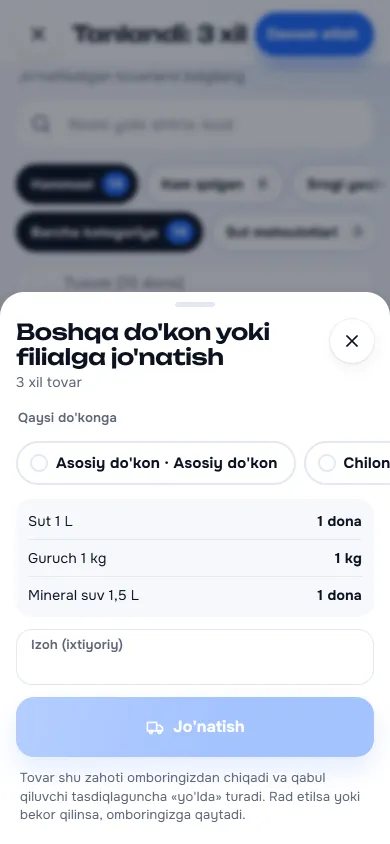
The send sheet with the receiving branch and the list of goodsThe send sheet with the receiving branch and the list of goodsNew design
The send sheet with the receiving branch and the list of goodsPrevious design
Sending to a branchWhich branch, which goods and a note. After “Send” the goods leave your stock and are “in transit”.
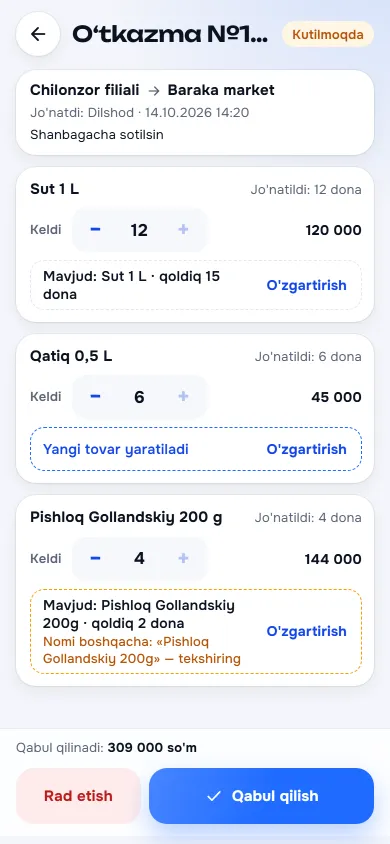
The receiving screen showing quantities sent and receivedThe receiving screen showing quantities sent and receivedNew design
The receiving screen showing quantities sent and receivedPrevious design
ReceivingEach line shows the quantity sent and received and which product card it goes into. Below: Accept and Reject.
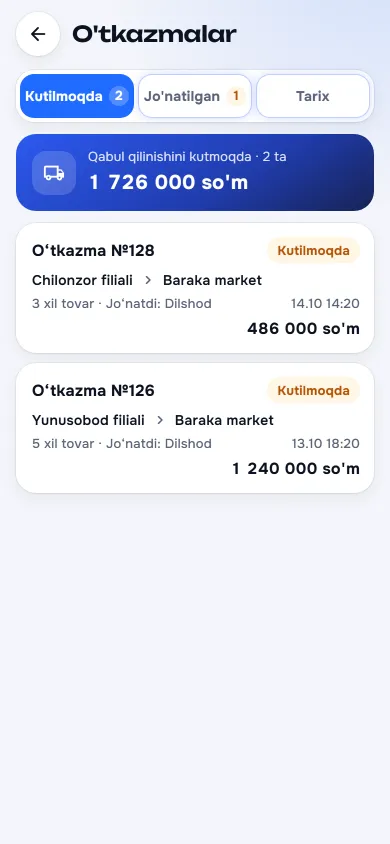
The transfers list with Pending, Sent and History tabsThe transfers list with Pending, Sent and History tabsNew design
The transfers list with Pending, Sent and History tabsPrevious design
Transfers“Pending”, “Sent” and “History”: each transfer’s status, who sent it and who accepted it.

These screenshots come from a demo shop: the products, staff and amounts in them are invented. The screens themselves look exactly like this.

Step by step

01

Pick

Tap Select in Stock: each item gets a tick box and a quantity that cannot exceed its stock. Scanning a code ticks the item or adds one to its quantity.

02

Send

Continue → the receiving branch, the list and an optional note → Send. The goods leave your stock and the transfer sits under Sent as “In transit”.

03

The receiver sees it

In the receiving branch the Transfers button in Stock shows how many are waiting; the owner and staff with the right permissions also see it in notifications.

04

Count and check

Each line shows the quantity sent and you enter what arrived (usually the same number). The app suggests which product card it goes into — “Existing: … · stock N” or “A new product will be created” — and Change lets you pick another.

05

Confirm

Accept adds the goods to stock; if anything is short the app asks you to confirm first. Reject asks for a reason and returns the goods to the sender. While nothing has been accepted yet, the sender can Cancel the transfer.

Which product card the goods land in

Every branch has its own product cards, so at receiving time the app looks for the matching one itself.

Stock, batches and money stay straight

Who sends and who receives

Sending and cancelling

The owner, or staff with the “Send goods to a branch” permission. The new permission is not in the ready-made sets — the owner switches it on for whoever needs it.

Accepting and rejecting

In the receiving branch: the owner or staff with the “Receive goods (goods-in)” permission. Without the right to create products, staff pick an existing card or leave the acceptance to the owner.

Viewing

Staff with stock access see their own branch’s transfers. The owner can open any transfer in the group; each one records who sent it and who accepted it.

Transfers and stocktaking

Goods in transit are in neither shop’s stock, so do not count them — or they will be counted twice. The stocktake screen warns you about unfinished transfers; it is best to finish them first. An item marked in a count cannot be sent or received until the count is done. The counting routine is in the stocktaking guide. Every transfer also shows up in the app’s notifications.

What this section does not do

We say it plainly up front, so there is no “but I thought it did that” later.

Questions about transfers

When do sent goods appear at the receiving branch?

Only once Accept is tapped. Until then the goods are in transit: gone from the sender’s stock and not yet in the receiver’s.

What if less arrives?

Enter what arrived and accept; the app asks you to confirm the shortage. It is recorded as a loss — the goods have already left the sender — and shows in the transfer and in the sender’s notifications. If the goods never arrived and should go back, tap Reject.

I sent it to the wrong branch — now what?

If it has not been accepted, open it under Sent and tap Cancel transfer — the goods come back to your stock. If it was already accepted, that branch sends the goods back to you with a new transfer.

What price does received stock get?

A new card takes the sender’s selling price and the cost from the transfer. Added to an existing card, its selling price stays the same and the batches come in at their own cost, so profit is still calculated correctly.

Is there a waybill?

There is no printable waybill. The transfer opens in the app: every line, the quantities sent and received, the totals, and who sent and accepted it — all on one screen.

Can goods go main shop → branch and branch → main shop?

Yes, between any open shops in the group: main shop to branch, branch to main shop, and branch to branch. More about branches on their own page.

Related pages

BuySale

Move stock between branches — counted and confirmed

7 days free, no payment card needed. Then from 6 630 UZS a day by shop type; branch pricing is on the pricing page.

Start for free